Ethernet Doesn’t Have a Valid IP Configuration in Windows 10 – Fixed!
Last Updated on April 30, 2021 by Jhonni Jets

Ethernet Doesn’t Have a Valid IP Configuration in Windows 10 – Fixed!
So you are facing the invalid IP configuration issue and thinking why Ethernet doesn’t have a valid IP configuration? Click the article to read the cause and the solution.
Have you ever wondered how our PC connects the internet with the device? That is by using the IP (Internet Protocol) address. But sometimes, connecting the device with an internet connection such as Ethernet is not as simple as you may think of it.
Table of Content
Read Also: How to Get Wired Internet in multiple Rooms? – Ultimate Guide
Without a doubt, Ethernet is a powerful internet connection more than Wi-Fi. But the negative point about this is Ethernet doesn’t have a valid IP configuration in Windows 10.
But Why Ethernet Doesn’t Have a Valid IP Configuration in Windows 10?
There can be many reasons for this cause. But the most common reason for this issue is due to the Network Interface Card. Sometimes the Network Interface Card is enabled to access the IP configuration.
So, How to Solve the Issue?
Nowadays, the solution is present for everything. If you have a Windows 10 device, and facing the same issue, follow the below procedure to solve it. Make sure to follow the process as such.
1.Restart the PC

Before stepping into the process, you need to restart your system. Open the Windows icon in the Taskbar. Now click on the Power icon and select the restart mode. Make sure that all necessary files are closed and saved. Otherwise, you will lose the data.

While restarting the system, do not shut down the PC. Now, wait for about 2-3 minutes to ensure that the system is restarted perfectly. Log back into your Microsoft account. The LED lights will indicate that the PC is started. Now is the time to step into the second step.
2.Disable the Quick Startup Feature
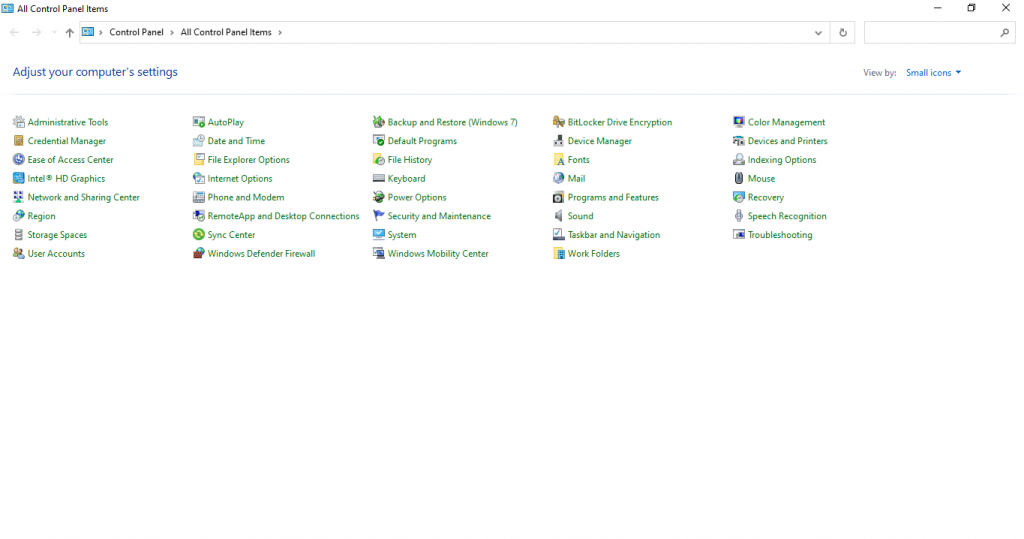
This step is a little bit detailed. You will need to open folders one after another. For fast hibernation recovery, the quick startup feature is the best option. Now open your start menu and search for Control Panel. The option that pops up at the top click on it.

Now a new folder will display on the screen. Here you can change your date & time settings, manage storage space, security & maintenance, and Troubleshooting. But for the Ethernet valid IP configuration, you need to click the Power Options.

Now again, a new window will pop up. Click on the second option (Choose what the Power Button do) on the left side menu. Keep in mind to read the options carefully. Without reading carefully and clicking on random options will not help at all.

After clicking the Choose what the Power Button do option, a new page will open. Here again, you have to select a new open. On the screen, you will see a link Change Settings That Are Currently Unavailable.

Below on the same page, a few options are visible. You have to make some changes here. You will see that out of the four options three are marked. You have to unmarked one option here. The most recommended option in the case of Ethernet is the first option.

After un-marking the first option Turn on fast startup (recommended), click on the save change option. Now close all the tabs, refresh the windows, and then restart the PC.
3.Time to Change Network Adapter Settings
Since you already have made changes in your PC system, now is the time to update the Ethernet Network Adapter Settings. Press Windows Logo Key along with the R button, both at the same time.
The Run window will appear on the screen. Here you have to change the written code. Type ncpa.cpl in the code bar and press okay.

A new window will pop up automatically. You will see two options on the screen; Ethernet and Wi-Fi. Since you have to solve the Ethernet IP configuration, right-click on the Ethernet option to change its properties.

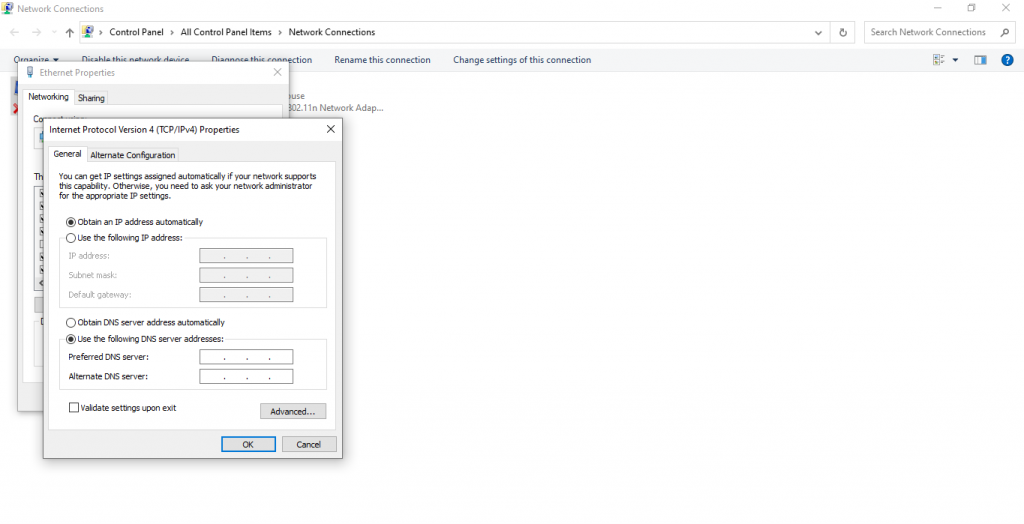
Okay, do not get confused by the various option popping on the screen. Your work is pretty simple here. You will notice that many options are marked here, while some are not. You have to double-click the Internet Protocol Version 4 (TCP/IPv4) option.

After marking the Internet Protocol Version 4 (TCP/IPv4) option, you have to click on the properties below on the same screen.
Now you will see the properties options on the screen. Mark the following options,
- Obtain DNS Server Address Automatically
- Obtain an IP Address Automatically

After enabling the options, fill the following codes in the columns.
- IP address: 192.168.1.15
- Subnet mask: 255.255.255.0
- Default gateway 192.168.1.1
In the second section,
- Preferred DNS Server: 8.8.8.8
- Alternate DNS Server: 8.8.4.4
There is a disclaimer. In this method, we have changed the DNS to Google DNS. In your case, it might be possible that there is no need to change both options.
4.Restart Your Modem
All the necessary settings are complete. Now you have to check your modem. Switch the modem off, and for about 4-5 minutes, then again switch it on.
There is an 80% chance that now your issue has been solved. But if still, the Ethernet doesn’t have a valid IP configuration, you need to change your Ethernet cables or the modem.
Once you are done with changing the modem and the cables, step into the next step.
5.Network Adapter Reinstallation
To reinstall the network adapter, you have to open the Run bar. The same as we do in the above section. Press the Windows Logo Key and the R button both at the same time.
Previously when we changed the adapter settings, we type the code ncpa.cpl. But this time, you have to type, hdwwiz.cpl code. By pressing the okay option, a new window will appear on the screen.

Among all the options, you have to click on the Network adapters to expand the selections.


Now right-click on the first option, and uninstall it. In our case, the option is Broadcom 802.11n Network Adapter. You might have a different choice according to the Ethernet Card installed in your system.
After uninstalling the Ethernet card, you have to restart your PC, so that the uninstalled Ethernet card reinstalls automatically. But sometimes, the system doesn’t reinstall the card automatically. If this also happens to you, you have to open the Device Manager and click on your PC name. Now search for hardware changes. The hardware changes will automatically detect the missing part and will reinstall it.
6.Reset the TCP/IP
Even after this whole detailed process, your Ethernet doesn’t have a valid IP configuration, then get ready for the last and the most effective way to kick the issue.

In the search bar of your Taskbar, search for Command Prompt. Here a new window will appear in front of you. On the right side of the window, click on the Run as Administrator option. Now the system will ask you for permission to make changes. Click on the yes choice. Now the command Prompt screen is in front of you.

Here, enter the following codes;
- reset netsh int IP resetnetsh Winsock
- netsh Winsock
Once you enter the first code, the system will ask you about restarting the PC. Ignore the option at this stage. Now after entering the second code, restart the PC.

We guarantee after this step, the Ethernet IP configuration in Windows 10 must-have solved.
Wrapping Up!
Without a doubt, the whole process is complex, but the supported screenshots will help you in selecting the right option. Make sure to follow the process, as such, and enjoy power internet with the Ethernet.


