

Last Updated on October 2, 2023 by Jhonni Jets
How to Fix a Bend Headphone Jack? – 4 Methods to Fix
You might find yourself in a situation where your headphone jack is not working. These headphones-related problems might happen to anyone and no doubt, they are really frustrating.
You might be lucky if you haven’t faced any of the headphones and their jack’s issues yet. Usually, these problems are faced by people who listen to music regularly or use headphones often.
Table of Content
The most important part of any pair of headphones is the headphone jack. Besides, they are also one of the most sensitive parts. Even a little misalignment can ruin the headphones you love so much.
Read Also: How To Get Hulu On Philips Smart TV 5000 Series
Bending of the headphone jack is a common thing and no doubt, we’ll have tried once to fix the jack by twisting it forcefully, tucking, bending pulling, or setting the wires in all possible ways to get the right sound quality back, but it is seen that we are often failed in doing so.
The level of frustration increases when you come to realize that you have caused damage in search of a cure.
Read Also: How to Install Popcorn Time on iPad
No need to worry, because today we are going to save you from all these frustrating issues related to the headphone jack by providing the best ways to fix a bent headphone jack. Moreover, we will also discuss some additional and beneficial content like common problems with the headphone jack and how you can avoid bending your headphones plug.
How to fix a bend headphone, Jack?
Now, you don’t have to hold your headphones in a specific position to make them work. Here are some quick DIY hacks that will fix the best headphone jack right back to its original shape. You don’t have to go to any repair center.
But first, let me clarify that
Many people thought that headphone jacks and headphone plugs were the same things.
The headphone jack or audio jack belongs to a family of connectors that are used to transmit audio signals.
The male connectors are also known as plugs, which are plugged (inserted) into the female connectors also referred to as jacks.
So, when we say something about bending a headphone jack, we are referring to a bent headphone plug.
Common issues with the best headphone jack
A bent headphone jack might not look like a big hassle but when it starts to cause problems you don’t expect it’s way more than frustrating to handle it. Here are some things that can happen with a headphone jack that is even slightly bent:
- Stereo mode problems
A bent headphone jack can interfere with the wires inside, which causes stereo mode problems where only one side of the headphones works.
- A loose headphone jack
A bent headphone jack doesn’t fit in the jack properly and causes it to slip off unintentionally no matter how much you try to fix it or keep it in.
- Static sounds
You might find yourself in a situation where you don’t have any issues with the only side of the headphones that can play, but also you might get static sounds from both sides of the headphones even when you are listening to any audio or not.
- Low volume
Even after doing so many settings on your devices, your headphones still play at a low volume.
Fixing a headphone jack
To fix a headphone, you will need to go through a bit of DIY experience.
If you own a cheap headphones pair, then we would suggest you go with a better alternative which is buying new headphones.
But if you want to repair your headphones, keep in mind that if you repair your electronics on your own you might end up damaging them. And if the electronic finds damaged, you also won’t be able to claim any existing warranty which makes you non-eligible for future replacement and repair.
Let’s get started with how to fix a bent headphone jack.
There are 2 methods by which you can fix a headphone jack, the first method is invasive and the other one is less. Unfortunately, both methods include the risk of damaging the electronics, but if you do the procedure carefully then the procedure might be valuable for you in the future when you will be fixing your electronics in the future.
Note: 3.5mm headphone jack are sensitive, so it is highly advised that they should be used and handled with care, even a single flick or move can cause permanent damage. To ensure the proper working of headphones, avoid forcefully pulling, pushing, bending, or turning the headphone jack.
Method #1
Tools:
This method requires a few basic tools that you might already have in your toolbox.
Tools you need:
- Straight ruler.
- Two pairs of pliers.
Procedure
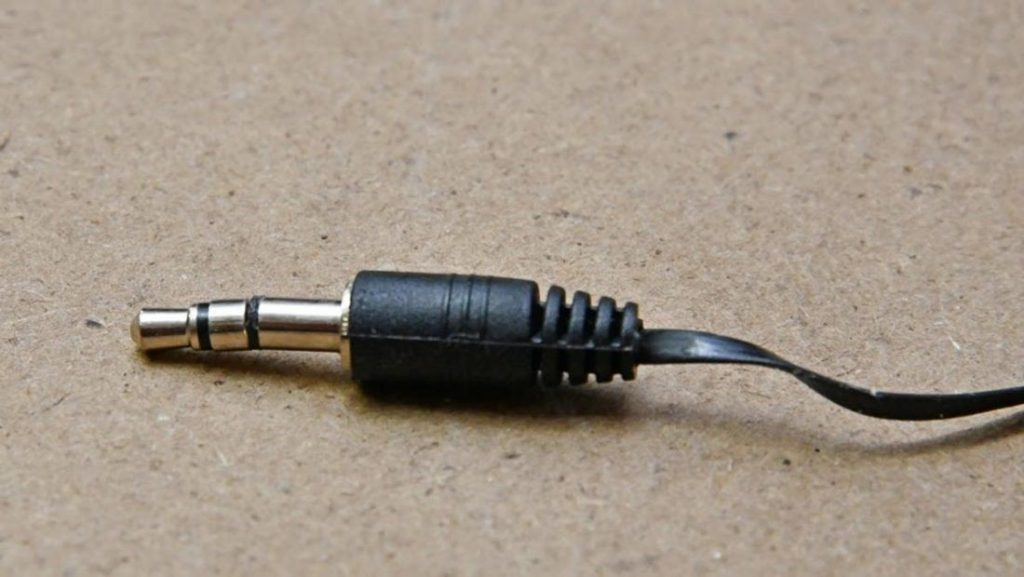
- First, take 2 thin pliers in your hand. Use one of them to hold the tip of the plug and use the other one to hold the ring or you can also hold the middle section.
- Now, bend the plug back using a strong but gentle force.
- Now, get your hands on the straight ruler and check to make sure that the plug has straightened. If the jack isn’t back to its original position, keep applying a gentle force until it gets back to its original position.
Method #2
Replacing the bent with a headphone plug
If the above-written method doesn’t work out, then the other way to fix your headphone jack is by changing or replacing the plug.
Those who don’t know how a soldering ironworks, are advised to get it done by a pro. Or you can also watch the video of replacing a bent headphone plug.
Tools you need:
- Soldering iron.
- New stereo 3.5mm plug.
- Wirecutter or scissors.
- Helping hands tools.
- Heat shrink.
- Solder.
- Small damp cloth or sponge.
- Wire stripper or a small, sharp knife.
Procedure
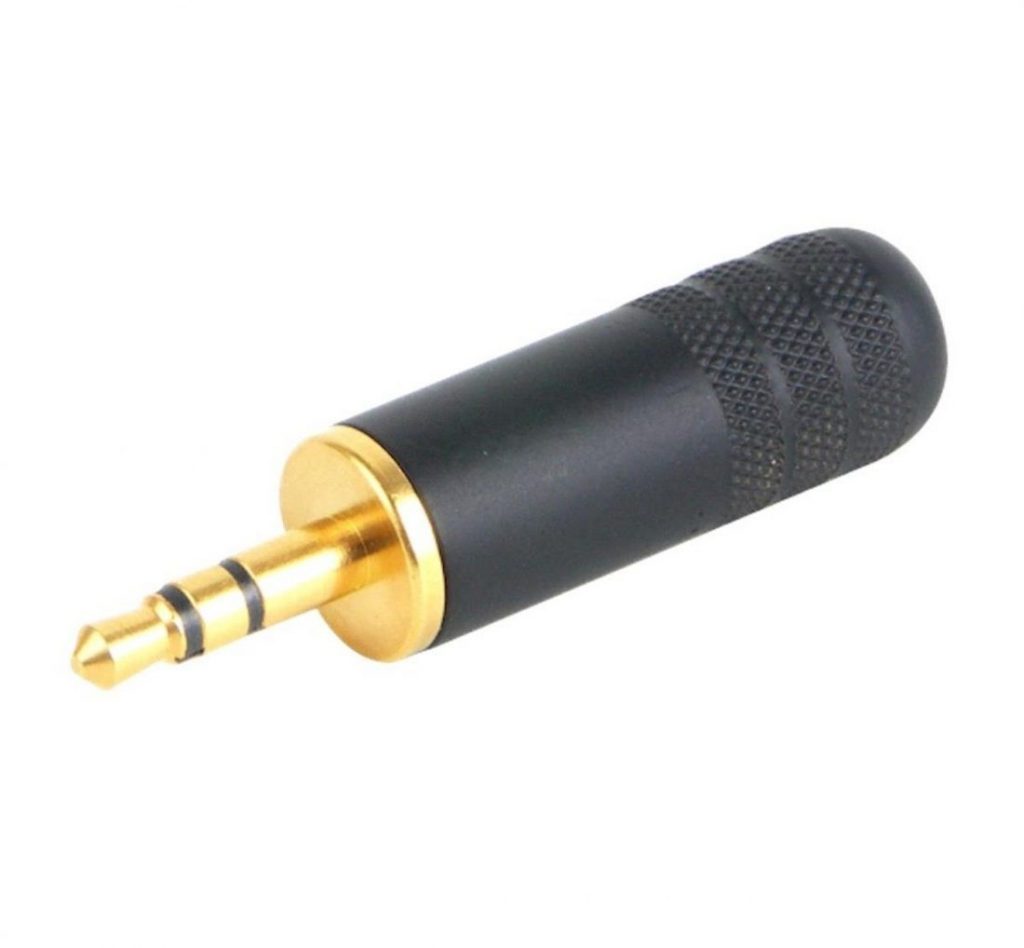
- Firstly, you will need to buy a new 3.5mm headphone plug. You are free to choose any as there are plenty of brands.
- Now, use the wire cutter to cut the plug from the cable. If you don’t have a wire cutter, you can also use a sharp pair of scissors.
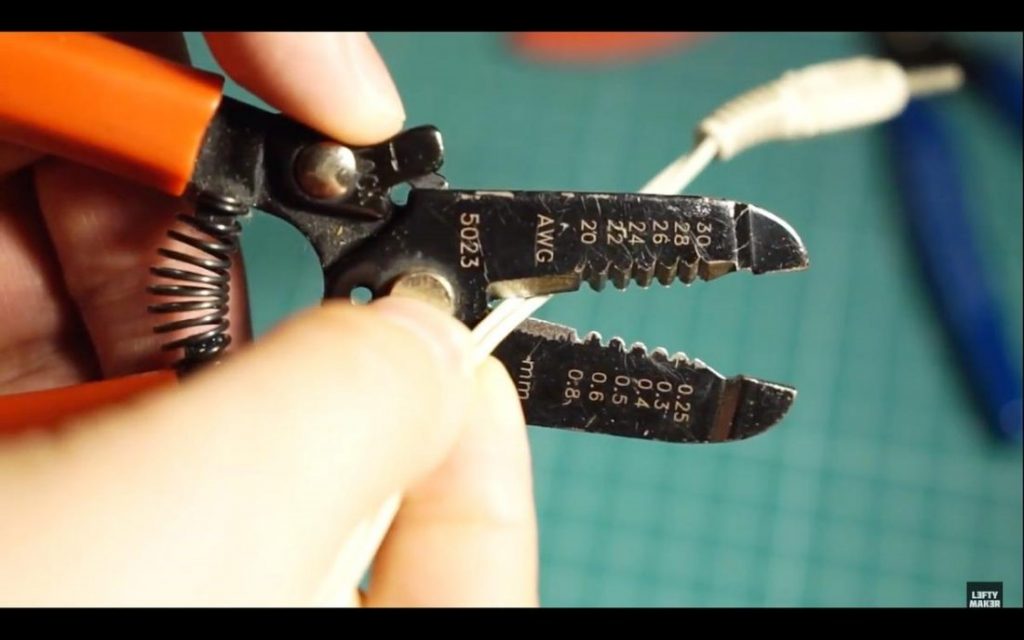
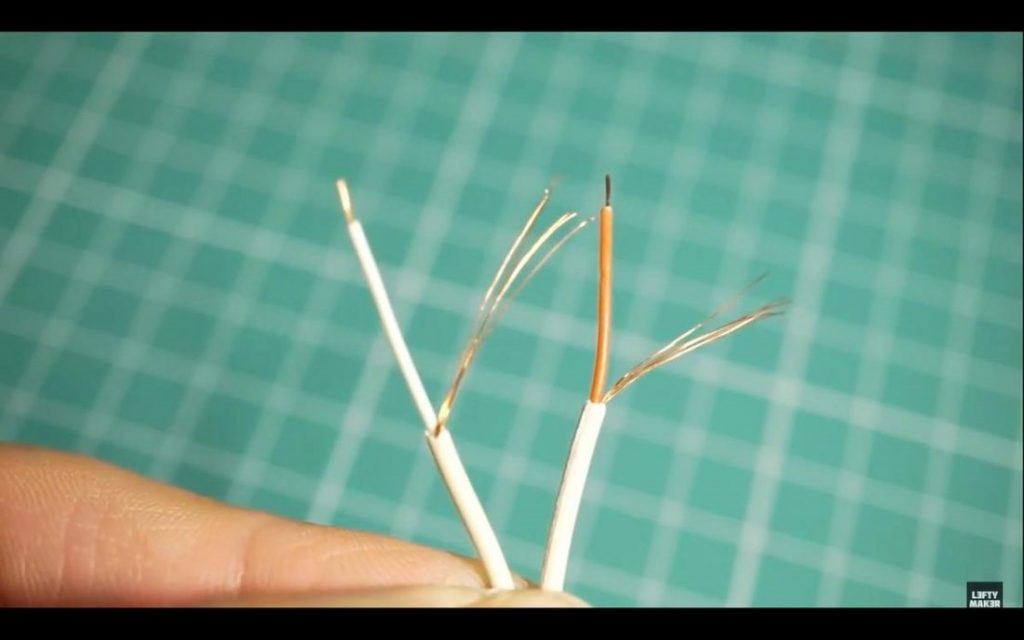
- Now, use a sharp knife or a wire stripper and remove the outer jacket of the cable about an inch from the tip side of the cable. Some of the cables come with an enamel coating if your headphone has such a coating then first expose the coating by opening the flame for a few seconds. The heat will melt the enamel and reveal three separate wires.
Red: For the right channel or the ring.
Bare/black: For ground.
White: For the left channel or the tip(can also be green or blue).
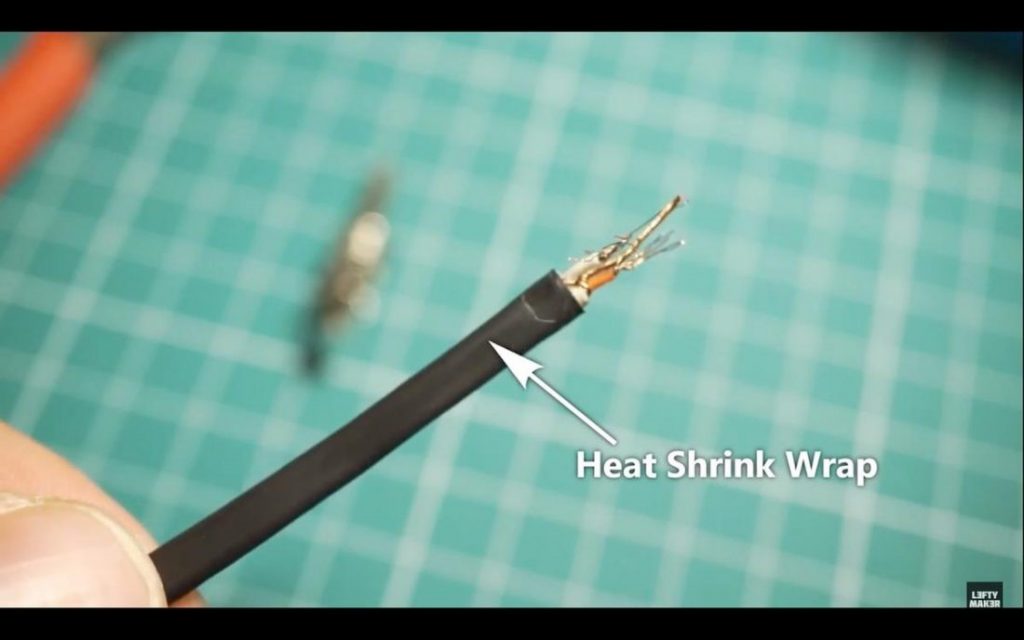
- Now, heat the soldering iron and then take some solder and apply it at the ends of the wires. This process is known as the tinning of wires. If your headphones have 2 ground wires, then before tinning make sure you wrap them around each other. Now use a sponge or a damp cloth to wipe off the tiny pieces of solder in which the iron is collected.
- After that, the heat shrinks from the wires, this will provide protection and insulation.
- Now, to unscrew its casing, take a new plug insert the tinned wires in the casing, and make sure that the tinned wires face the right direction.
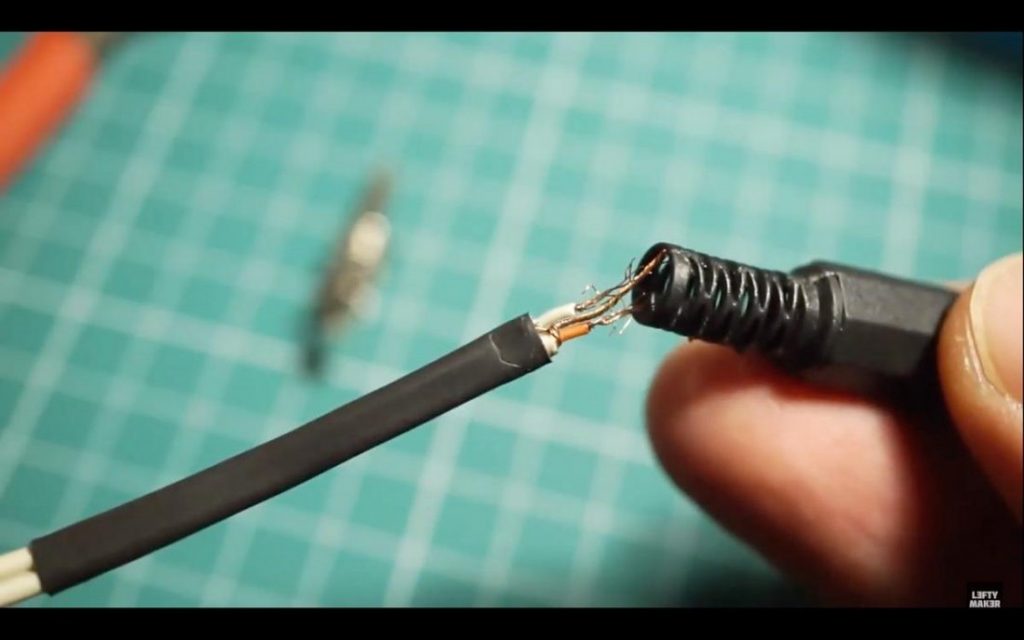
- Now, pick up the helping tool and hold a new plug with it to attach the wires to the plug easily.
- Now, start with ground wire and insert that end into the contacts of the new plug. Start with the left wire and then go on to the right wire. If they don’t fit correctly, then hold the wire in the same place for some time and the solder to cool down.

- Now heat shrinks the case over the wires and then screws the casing back in to plug.
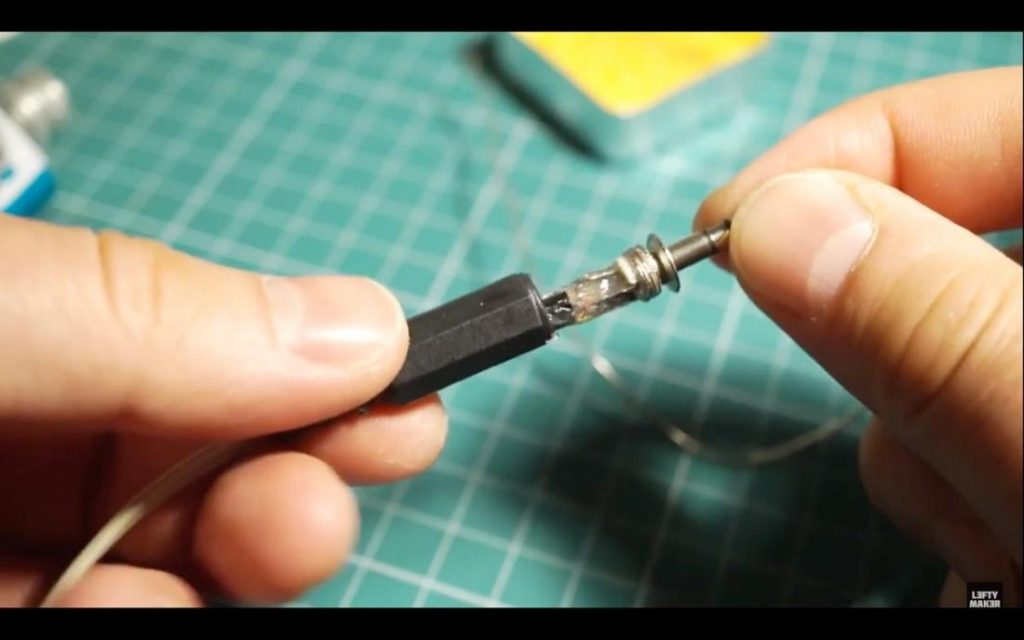
- Finally, it has been done. Now, check if the headphone plug doesn’t work correctly then there might be chances that the right and left wires are mixed up. If that’s the case, you’ll need to de-solder the wire. To de-solder the wires you’ll need to touch the soldering iron to the connections. By doing so, the wires come off easily and you can solder them in proper places.
Method 3: Use a Small Suction Cup to Pull the Bend Out
Another method you can try without specialized tools is using a small suction cup to grip and pull out the bend in the headphone jack gently over time. Here is how to do it:
Things You’ll Need:
- A small suction cup, like one from a child’s bath toy
- Flashlight
Step 1: Identify the Bend
Inspect your headphone port with a flashlight to locate exactly where the bend is. Determine if the suction cup will be able to grip the bent portion adequately. The suction cup needs to make tight contact.
Step 2: Affix the Suction Cup
Place the suction cup over the bent part of the headphone jack so that it sticks firmly. Press down tightly initially to achieve a strong seal on the jack with the suction cup before attempting to pull.
Step 3: Slowly Pull Outward
With the suction cup firmly affixed, begin slowly and gently pulling outward, away from the direction of the bend. Rock the suction cup slightly as you pull to apply pressure at different angles against the bent portion.
Step 4: Periodically Check Progress
Every so often, remove the suction cup and check if the bend looks straighter than before. If progress is being made, continue this process incrementally, applying only gentle pressure, until the jack is realigned.
Step 5: Watch for Cracks
Visually inspect the port as you go to make sure no cracks are developing. Stop immediately if anything starts cracking and consider a different method or professional help if cracking occurs.
Step 6: Test Headphones
Once the port looks straight, connect your headphones and test audio playback. If sound only comes through one side or has issues, the jack may need more straightening or internal repair.
Method 4: Use a Deburring Tool to Straighten the Rim of the Port
If your headphone jack issue is due to the outer rim being bent in a way that obstructs headphone insertion, you can use a deburring tool to fix it. Deburring tools are metal devices with a cylindrical blade designed to clean up and straighten machined metal parts. Here’s how to use one on a headphone jack:
Things You’ll Need:
- A deburring tool or reamer
- Flashlight
Step 1: Inspect Rim Damage
Use a flashlight to closely inspect where the rim of your headphone port is uneven, dented or compressed inward. Determine the exact section that needs straightening with the deburring tool.
Step 2: Insert Cylindrical Blade
Carefully insert the cylindrical deburring blade into the headphone port, aligning it with the section of rim that needs straightening. Insert it as deep as needed to reach the damaged area fully.
Step 3: Rotate Gentle Pressure
Gently twist the deburring tool back and forth while applying light inward pressure. This will scrape against high spots and compressions to straighten and smooth the rim without removing material.
Step 4: Frequently Check Rim
Remove the deburring tool and inspect progress often. This ensures you are applying pressure only to the intended area and avoids thinning the rim excessively in any spot.
Step 5: Clean Out Metal Shavings
Make sure to use compressed air to blow out any small metal shavings that accumulated inside the port during the deburring process before inserting headphones.
Step 6: Test Fit and Audio
Check that your headphone connector now fits properly in the port without obstruction. Also test audio playback to confirm the deburring repaired the issue fully and sound is clear.
How to Avoid Bending Your Headphones
Well, the easiest way to prevent your headphones from bending is to prevent them from forcefully pulling, pushing, and flicking in the first place.
Keeping your headphones with care will surely give you the best sound experience and long-term usage. Here are some things that you should take care of when using your headphones.
- Pull the headphone plug, not the cable gently but firmly.
- Always untangle the wire before you use headphones.
- Remove your headphones from the jack when you are not using headphones.
- Buy headphones that have a right-angle plug.
When to Seek Professional Repair
While the methods above may fix many bent headphone jacks, sometimes the damage is too complex for DIY repair:
- If the jack has cracks, fragments, or pieces broken off, professional help is recommended.
- If the audio continues to cut out or only plays on one side after straightening, there is likely internal damage.
- If the jack straightening attempts make the bending worse, stop and seek electronics repair.
- For children’s devices, the components are often too delicate for brute-force straightening.
- If the jack is deeply recessed in the device, visibility and access are too difficult for DIY repair.
Seeking professional electronics repair is advised if DIY efforts are unsuccessful or the bending is too severe. Internal parts like contacts or solder joints may need replacement. Rather than risk further damage, enlist an experienced repair expert if needed.
Wrapping up
By using any of the above methods you can easily learn how to fix a bent headphones jack without the need to head on to the repairing center. Sometimes, fixing a loose headphones plug just needs a simple fix that doesn’t include the risk of damaging your headphones.
Fixing headphones can be a lengthy task but in the end, you get to enjoy those of your favorite music, TV shows, and podcasts again.
Thank you.